EDU4AI - Autonomous Driving Cars
This tutorial is part of the following EU funded project:
Edu4AI - Artificial Intelligence and Machine Learning to Foster 21st Century Skills in Secondary Education, in the framework of Erasmus+, Grant Agreement VG-IN-BY-20-25-077366
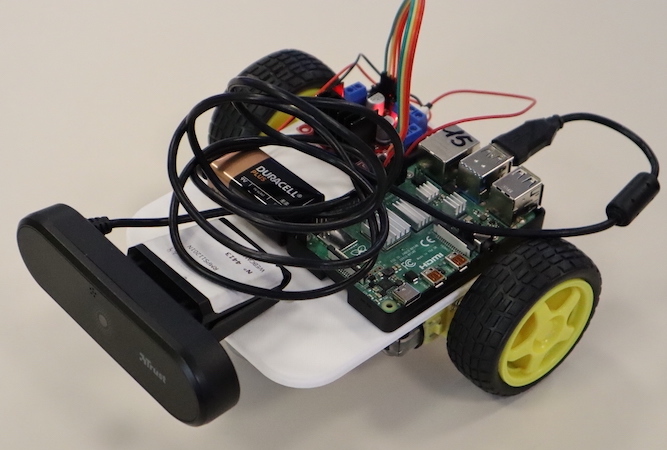
Final result
Get the parts
For our project we used the following parts
- Raspberry Pi version 4
- MicroSD card minimum size 16 GB
- Two wheels with rubber tires
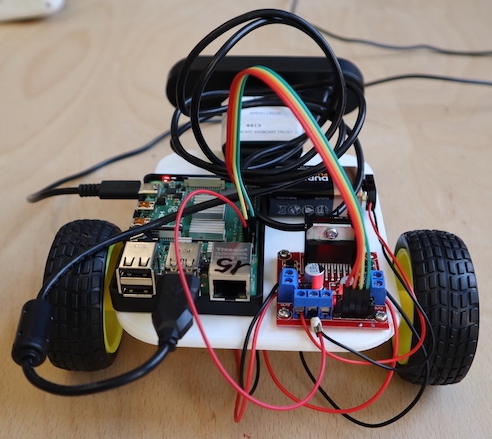
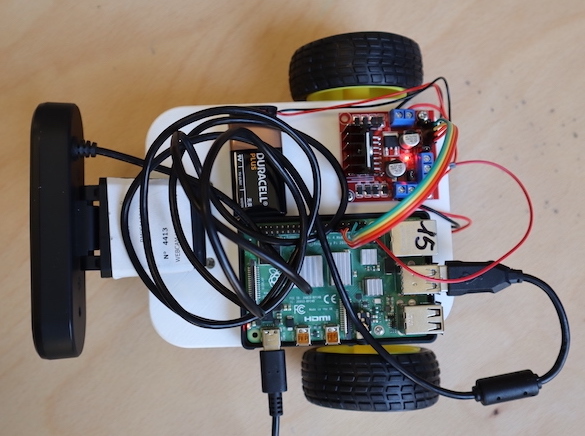
- L298N Motor Drive Controller
- USB 5V power bank, with at least a good quality 2.5A power output (USB-C)
- 9V battery with clip
- USB webcam with hole for tripod
- Jumper wires F/F and F/M, to connect everything
- M2.5 and M3 screws, assorted lengths
- double-sided tape or Patafix
- 1/4” slotted screw (for camera)
- ball castor (we used a two-holes ball castor, with distance of 38mm between them)
- a micro-HDMI to HDMI cable or adapter to connect your Raspberry to a monitor
Optional:
- Raspberry case
Just as reference, you can see the list part here.
Chassis
More information on how we created the chassis in the dedicated page.
Power
In this project, we use two separated power source:
- a power bank for the Raspberry PI
- a 9V battery for motors (rechargable)
Note: we cannot use the Raspberry Pi to power motors, since its output are not suitable for supporting loads, so we need an additional power supply, and a 9V battery is a good solution.
We reccomend rechargable 9V batteries, since common 9V battery would last less than hours, according to our experience (see the shopping list above for details).
According to official documentation, we can use a good quality 2.5A power bank to power the board if the downstream USB peripherals consume less than 500mA in total. We have only one peripheral, the webcam, that should stay inside this limit.
L298N <-> Raspberry Pi GPIO pins
| L298N | Raspberry PI GPIO PIN | Raspberry Pi pin description |
|---|---|---|
| IN1 | 29 | GPIO5 |
| IN2 | 31 | GPIO6 |
| IN3 | 37 | GPIO26 |
| IN4 | 36 | GPIO16 |
| GND | 39 | GND |
Prepare the SD Card
We used the official Raspberry Pi OS.
We tested the project with:
- Raspberry Pi OS with desktop
- Release date: April 4th 2022
- System: 32-bit
- Kernel version: 5.15
- Debian version: 11 (bullseye)
Set up the Raspberry Pi
Connect a mouse, keyboard and monitor to your Raspberry Pi and power it. Follow configuration and initialisation instructions if any.
To upgrade the Operating System, open a Terminal window and execute:
sudo apt update
sudo apt -y dist-upgrade
Answer ‘yes’ to any prompts.
Now we should install VNC (Virtual Network Computing) to access the Robot remotely using our Windows laptop.
Install VNC server on the Raspberry Pi
sudo apt update
sudo apt install realvnc-vnc-server
Then from the Pi menu enable the VNC by: Raspberry Pi Menu->Preferences->Raspberry Pi Configuration->Interface tab->Enable VNC and click OK.
After that you should install a VNC viewer on your Windows laptop; you can download it here.
Get the IP from the Raspberry using:
hostname -I
Put this IP into the VNC viewer on your laptop.
Move the motors
We are now almost ready to actually move the motors.
On the Raspberry PI, click on the menu on the top right->Programming->Thonny Python IDE.
from gpiozero import Robot
myRobot = Robot(right=(26,16), left=(5,6))

# Argument is the speed, from 0 (stop) to 1 (max speed, default),
# leave empty for default.
# I suggest to start with 0.6, and eventually change it.
# Use these commands on the intearctive console.

myRobot.forward(0.6)  # go forward
myRobot.backward(0.6) # go backward
myRobot.left(0.6) # turn left
myRobot.right(0.6) # turn right
myRobot.stop() # turn right
Train your model
Go to Teachable Machine.
Use “Standard Image Model”
After training, export as Tensorflow Lite -> Quantized
We used the Duckietown Traffic Signs to train the model.
Test trained model with your car
Open a terminal on Raspberry Pi and install dependencies.
sudo apt update
sudo apt -y install libjpeg-dev libtiff5-dev libjasper-dev libpng-dev
sudo apt -y install libavcodec-dev libavformat-dev libswscale-dev libv4l-dev
sudo apt -y install libxvidcore-dev libx264-dev
sudo apt -y install libatlas-base-dev

pip3 install opencv-python

pip3 install tflite-runtime

pip3 install numpy --upgrade
Create a folder on Raspberry, unzip the Tensorflow model and download the classify_webcam.py example inside it.
Inside a terminal, test that everything works:
python3 classify_webcam.py --model myModel/model.tflite --labels myModel/labels.txt
With this script, without any modification, you can immediatly check that image detection works and manually drive the robot using WASD keys.
However, you need to modify it to actually implement an autonomous driving.
Follow a path
To challenge students in something mesaurable, we drew a path on the floor of the laboratory with scotch tape.
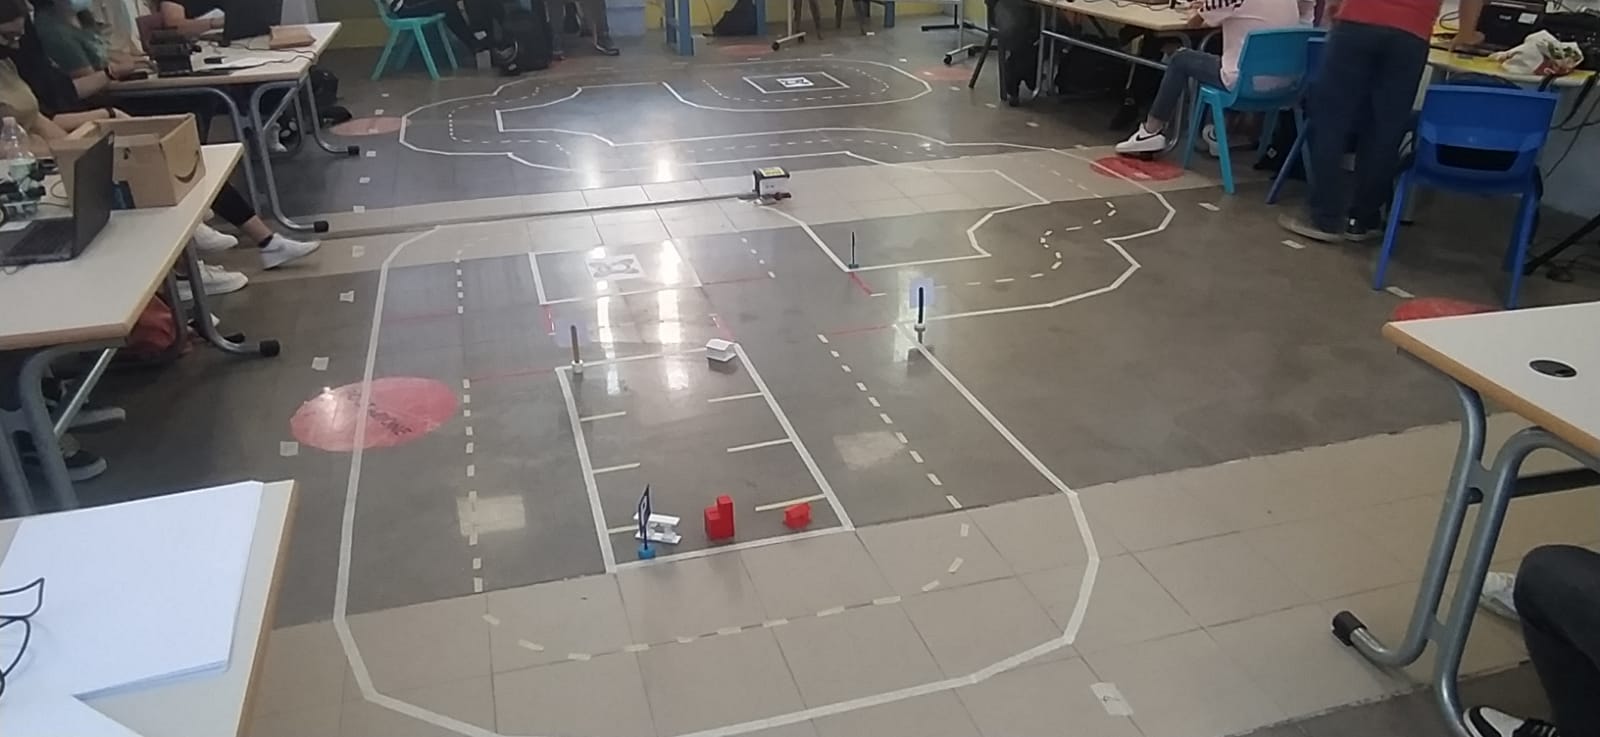
We used Duckietown Navigation specification to draw the roads. This is not mandatory, since we do not want to participate in Duckietown competitions and we did not follow exactly the standard, but it is useful to have a starting point. In particular, we did not trained AI to follow the lines, but just to recognize traffic signs.
We also used Duckietown Map-Utils repository to generate a random map, but a simple ring in a 3x3 map should be enough to start challenging student in following a path with traffic signs.